Flower Power
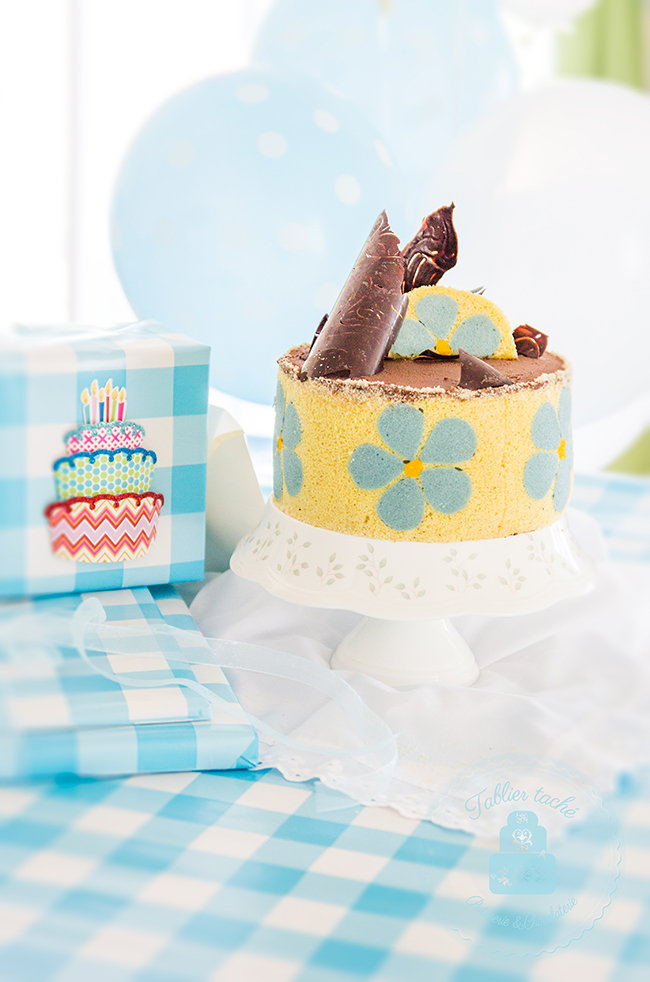
Blooming Chocolate Mouses Celebration
to a very special, turning 14 years flower!
Think about the cake a few days in advance - while you are waiting at the bus stop, or waiting for a children's class to finish. Decide what image will fit perfectly the occasion.
Prepare the design that you would enjoy on the sides of your cake. I first draw it on a sheet of paper. From a thick acetate sheet cut the design, making your own stencil - there is nothing more satisfying in making cakes than using your signature, even if it is in a small detail.

For the Ribbon Sponge (as per "Le Cordon Bleu"):
have all the ingredients at room temperature
50 g butter
50 g confectioners' sugar
50 g egg whites
55 g flour
food colouring
Joconde Sponge
Prepare the coloured paste first as it needs to harden for a while in the refrigerator, once it has been shaped: Beat the butter until creamy, add the sugar, mixing well. Add the whites, while beating. As soon as they are incorporated well, mix in the sifted flour. Colour the paste as desired. I used mix of "Dauphin blue" and "Teal". It will never be a bright colour as the paste itself is ivory-ish.

for the Joconde Sponge (as per "Le Cordon Bleu"):
(for a sheet pan 28 x 40 cm)
(for a sheet pan 28 x 40 cm)
85 g powdered almonds
75 g confectioners' sugar
25 g flour
120 g eggs
80 g egg whites
10 g sugar
30 g melted butter


Place the genoise layer at the bottom of the ring pressing gently but confidently to avoid any gaps between the bottom and the side lining of the cake.

Cover with foil (to avoid drying out of both sponge layers) if planning to continue the following day.
for the dark chocolate mouse I:
220 g dark chocolate - 70% cocoa
185 ml heavy cream
3 g gelatin powder
25 ml cognac Courvoisier
35 g sugar
30 g whole egg
15 g egg yolk
Have a bowl and whisk attachment in the freezer for 10-15 min.
Melt the chopped chocolate over bain-marie.
Take the "freezing bowl" out of the freezer and beat the cream - first at low to aerate and than increase to high speed until soft peaks are formed. Keep it in the refrigerator until needed.
Add 6 g to the gelatine powder and let it bloom.
Cook the sugar with 10 g water over a medium heat for about 5 min, until thickens a bit and a drop of the syrup forms a sphere shape over a cold plate. While the syrup is cooking, beat the egg and the yolk until pale and foamy (preferably to use a self-standing mixer: this will allow a constant supervision over the sugar syrup). Once the syrup is cooked to its setting point, add the "bloomed" gelatine, stir until dissolves. With the mixer working on the egg mixture, pour the hot syrup carefully, "washing" the sides of the bowl. Continue beating until the mixture reaches approximately room temperature. Add the alcohol.
Fold in the melted chocolate with a spatula, until fully incorporated. With the same technic, fold in the cold whipped cream.

In a bowl, mix together the almonds, sugar and flour. Add the eggs in small portions, mixing well after each addition. With a whipping attachment, beat the egg whites with the sugar until firm peaks. With a spatula, fold in the flour-egg mixture. Fold in the melted butter.
Tailoring I: Take the Ribbon Sponge design out of the fridge. With a palette knife, spread the batter of the Joconde Sponge over in an even thin layer. It is important to keep the design underneath shaped and covered. Do not press the knife as you do not want to ruin the Ribbon Sponge design. Even if the whole pan is not filled with the batter to the edges, this is not a disaster, as strips will be cut later.
Bake at 200C for 8-10 min in the middle rack of the oven. If silicon liner is not available. place two sheet pans together - no browning at the bottom of the sponge is allowed as this will give unpleasant look to the cake.
Leave to cool in the pan. Carefully transfer it in a sifted with powder sugar parchment paper sheet, turning the design upside up.
for the Genoise Chocolate: one layer only will be needed for the base.
Either bake the whole recipe, cut in layers and reserve the once that won't be used. Foiled tightly, the layers could be refrigerated for up to one month. Or just use half of the recipe for baking one layer 18-20 cm in diameter.
Tailoring II: Measure precisely the height of the cake ring. Make a template strips from parchment paper, cutting two equally wide strips with the same with as the height of the cake. Measure the length of each strip and make sure that both will cover the inner surface of the cake ring. Place the templates over the Joconde Sponge layer the way that will allow you to follow the design without interrupting (you do not want to have a cut in the middle flower or twice the space between the flowers at the place where the strips connect). Cut the strips from the sponge, using a pizza cutter for sharp and even cuts.
Prepare the cake ring, lining the sides with the parchment strips used as templates, slightly higher than the height of the ring. Place the ring over a cake board.
Fill the ring with the sponge strips with the design facing the sides of the ring. The edges should fit perfectly. No place in between is allowed.
Once the cake ring has been lined with the Joconde Sponge, measure precisely the diameter of the bottom of the cake. Cut with scissors to the right size.
Place the genoise layer at the bottom of the ring pressing gently but confidently to avoid any gaps between the bottom and the side lining of the cake.
Cover with foil (to avoid drying out of both sponge layers) if planning to continue the following day.
for the dark chocolate mouse I:
220 g dark chocolate - 70% cocoa
185 ml heavy cream
3 g gelatin powder
25 ml cognac Courvoisier
35 g sugar
30 g whole egg
15 g egg yolk
Have a bowl and whisk attachment in the freezer for 10-15 min.
Melt the chopped chocolate over bain-marie.
Take the "freezing bowl" out of the freezer and beat the cream - first at low to aerate and than increase to high speed until soft peaks are formed. Keep it in the refrigerator until needed.
Add 6 g to the gelatine powder and let it bloom.
Cook the sugar with 10 g water over a medium heat for about 5 min, until thickens a bit and a drop of the syrup forms a sphere shape over a cold plate. While the syrup is cooking, beat the egg and the yolk until pale and foamy (preferably to use a self-standing mixer: this will allow a constant supervision over the sugar syrup). Once the syrup is cooked to its setting point, add the "bloomed" gelatine, stir until dissolves. With the mixer working on the egg mixture, pour the hot syrup carefully, "washing" the sides of the bowl. Continue beating until the mixture reaches approximately room temperature. Add the alcohol.
Fold in the melted chocolate with a spatula, until fully incorporated. With the same technic, fold in the cold whipped cream.
Tailoring III: Fill a piping bag with the mouse as soon as it is ready. Work fast and do not leave it to stay as it will harden very easily. Quantity of gelatine helps to structure the mouse into the desired shape. Using 6 mm round tip, pipe two circles: the one in the centre is lower than the the one along the side. Using a small palette knife, smooth the rings. Keep the form in the refrigerator while preparing the white chocolate mouse.
for the white chocolate mouse :
8 g powdered gelatine
140 ml milk
175 g fine white chocolate, chopped
200 ml 30% whipping cream
Place the chocolate in a heat-proof bowl. Bloom the gelatine into 16 g cold water. Bring the milk to the boil. Take it off the heat and add the gelatine, stirring until dissolved. While hot, pour it over the chocolate. Stir to homogenize and leave to thicken a bit at room temperature. Follow the procedure for cooling a bowl and a whisk attachment and whipping the cream as for the dark chocolate mouse. Fold the cream into the white chocolate with a spatula. Take the cake form out of the refrigerator. Pour the white mouse over the dark chocolate mouse, filling the mouse rings. Smooth the surface with a palette knife and place it back in the refrigerator for three hours.
The level is still beneath the top edge and that is jus great because we need more mouse, more chocolate ...
for the dark chocolate mouse II:
75 ml milk
30 g egg yolks
15 g sugar
160 g dark chocolate 70% cocoa solids, chopped
275 whipping cream (30% butter fat)
Bring the milk to the boil point. Whisk the yolks and sugar until light and pail. Temper the yolk mixture with a small part of the boiling milk, stirring constantly. Pour it back to the pan with the milk and place over medium heat, stirring constantly until thickens a bit. Take off the heat and if there are noticeable particles, sieve while hot over the chopped chocolate. Smooth with a spatula - a glossy mixture will please your sensors. Leave to cool while beating the cream as per instructions for dark chocolate mouse I. Fold the cream into the chocolate mixture. Fill in the cake form, levelling the top with the palette knife. Place back in the refrigerator for 2 hours.

Decorate with reserved petals from the design (if any) and chocolate decorations. Sift some ground almonds on the top edge of the cake.


Comments